
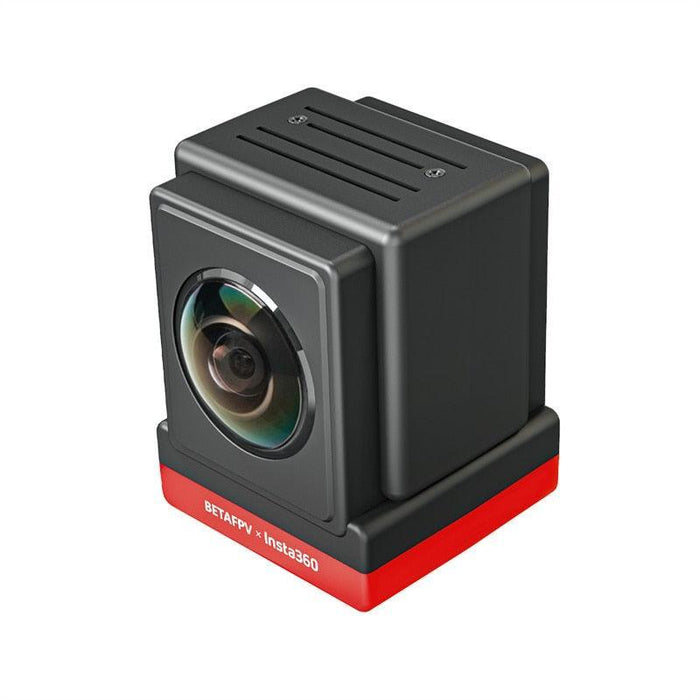


BETAFPV SMO 360 Wide-angle 4K Camera
free return
Do you live in Belgium or The Netherlands? Then you can return your package for free!
Description
Designed for Pavo360 FPV drone
- SMO 360 is an ultra-light action camera designed for mounting on the Pavo360 FPV drone. With a weight of only 55 grams, it can be easily mounted and carried on the Pavo360. Meanwhile, the inverted "pusher-style" frame maintains a low center of gravity and makes the drone easier to maneuver.
NB: Although the Pavo360 is equipped with landing gear designed to protect the SMO 360 camera lens, further protection is necessary. Strongly recommend to buy lens protector together.
Characteristics
- SMO 360 Camera is perfectly suited for the Pavo360 FPV Quadcopter, pilots can capture 360 views from the air and completely hide the drone from view.
- SMO 360 camera is an ultra-light panoramic camera specially designed for FPV drones. Developed by BETAFPV using Insta360 technology, it weighs only 55g and can be easily mounted on various FPV drones.
- With the SMO 360 camera's 5.7K 360-degree recording and FlowState stabilization feature, pilots can record 5.7K 360-degree video with greater detail, smoother stabilization, and better dynamic range.
- Support using the radio transmitter to turn on/off the SMO 360 camera and start/stop recording remotely, making it easier to operate.
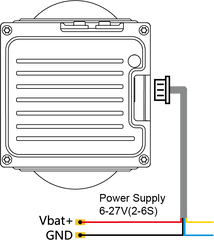
- The power supply range is 6V-27V and supports 2-6S Lipo batteries. The 4-pin pluggable connector allows pilots to easily connect the SMO 360 to your flight controller for power and recording.
FPV stabilization
- SMO 360 is supported with Insta360's FlowState stabilization, which ensures that the video is stable in flight no matter what maneuvers you try. This makes SMO 360 the perfect camera for capturing 360 videos while flying an FPV drone.
Longer distance between 2 lenses
- Developed by BETAFPV using Insta360 technology, the SMO 360 camera weighs only 55g and is perfectly suited for Pavo360 FPV drones. The distance between the 2 lenses is 40mm, allowing more room for the height of the drone, while the ONE R panoramic camera is 34mm. Meanwhile, SMO 360 camera supports remote control of turning on/off camera and start/stop video recording through controller like SMO 4K camera.
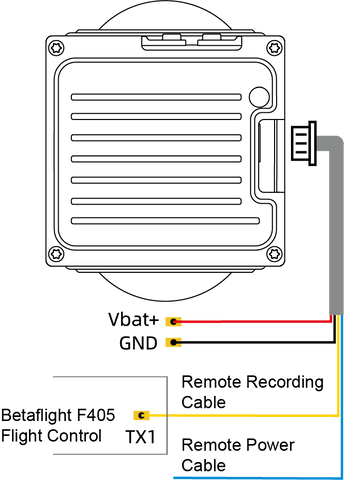
Power & TX Configuration
- The camera comes with a 6V to 27V power connector that supports 2S to 6S LiPo FPV batteries. In the accessory kit, the red wire in the connecting wires is the power wire and must be soldered to the positive terminal of the battery (VBat+); the black wire is the ground wire and must be soldered to the negative terminal of the battery (GND); the white SH1.0 connector must be plugged into the camera's power outlet. The power supply can be reached after completing the above steps.
The SMO 360 camera supports remote control of turning the camera on and off and starting/stopping video recording via the controller. The yellow wire controls the video recording on/off and the blue wire controls the camera's on/off.
Remark: The remote recording cable and the remote power cable are not soldered to the FC board at the factory. Solder it well before using these two functions.
Configure the PINIO function of TX1 pin through the following Betaflight commands.
resource SERIAL_TX 1 NONE //Disable the serial port function of the TX1 spindle
source PINIO 2 A09 // Configure the TX1 pin (A09 pin) as the #2 PINIO
function
set pinio_box = 40,41,255,255 //Set PINIO function interval
save // save configuration
The following diagram configures the PINIO function assignment relationship between the remote controller and the flight controller. In the Betaflight configuration, the PINIO function #2 (i.e. USER2 in the figure below) corresponds to the AUX5 channel of the remote control.

To activate or deactivate functions on the camera, you must move the switch from inactive (white area) to active (yellow area) and then back to inactive (white area).
Remark: The configuration of your flight controller and radio controller switch must match the configuration of your equipment. Make sure you know what you are doing before configuring. If you are not using the remote control function, cut or insulate the yellow and green wires separately and do not connect to any location.